
Custom Courses
Custom Courses
Chart your own course with precision and navigate the water with ease.
Custom Courses
In CrewNerd, a “custom course” is one where the start and finish lines are defined geographically, allowing the app to automatically start and stop the timer as you pass through the start line and finish line, respectively. Custom courses allow for hands-free operation during racing, or for more consistent workouts on your home water. With the new “waypoints” feature, CrewNerd can even help you navigate from one turn to the next as you move through a course, and tell you how far you are from the next turn (or the finish). You create custom workouts using the Google Earth Pro app on your desktop computer to name your course and draw the start line, finish line, and waypoints (if needed). You then export a KML file from Google Earth Pro containing your course(s), and import it into CrewNerd on your phone. Your courses will then appear in the list of custom courses on the workouts page.

Working with Files
To create and use custom courses, you will need to move KML files between your phone and your desktop computer. Of course, there are many ways to do this, and experienced users will know what approaches they prefer. But if this sounds daunting, we recommend using a cloud storage service to simplify the process.
You likely already have access to some cloud storage service, such as iCloud, Google Drive, or OneDrive. The good news is that any of these can be used to simplify the process of moving files between desktop computers and phones. If you install the storage service’s app on both the desktop and phone, you will be able to access files in the storage service as though they were stored locally.
In the sections that follow, we will refer to moving files between desktop computers and phones, and we will assume that you are either using cloud storage, or are experienced with other ways to achieve this.
Creating Custom Courses
Getting Started
To start working with custom courses, it helps to have some examples to look at and CrewNerd includes several built-in custom courses that you can learn from. To access the KML file containing these built-in courses, use the instructions below appropriate for your phone.

iPhone
Open the “Files” app on your phone, select the “Browse” tab, and then press “On My iPhone”. You should see a list of apps, including CrewNerd (or CrewNerd Lite). Select the appropriate CrewNerd folder and you should see files named “builtins” and “courses”. Press and hold on the builtins file and then select “Copy”. Then, move back up to the top “browse” page and select your cloud storage provider. Browse to the desired location in your cloud storage and then press and hold in any blank area below the file list. You should see a pop-up menu containing a “Paste” option that you can use to create a copy of the builtins file. You’ll want to rename this to “courses”, since that is where you’ll be copying the file after you create your custom courses.
Android
Start CrewNerd and go to the workouts page. Open the app menu and select “Export custom courses”. This will open a standard Android interface for saving files, and if you’ve set up your cloud storage service in Android, you should be able to select a folder in the storage service where you want to create the courses.kml file.
Custom Course Requirements
Now that you’ve created a “courses.kml” that you can access from your desktop computer, you can open the file in Google Earth Pro. In the “Places” window, you’ll see “courses”, and several folders beneath that containing the built-in custom courses.
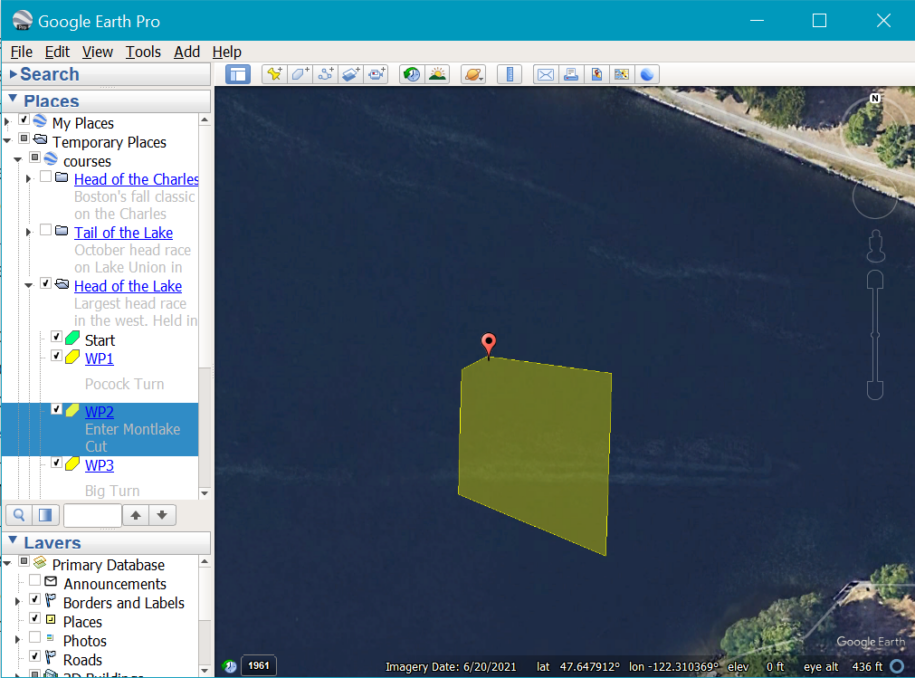
As you can see, each custom course consists of a folder with a short course name, and a longer description of the course. Inside the folder are two polygons named “Start” and “Finish”. Every custom course must have both a start and a finish.
CrewNerd uses polygons rather than lines because instead of detecting the crossing of a line, the app detects when you are inside the polygon for at least one second, and uses this to trigger the starting and stopping of the timer.
Your polygons should always contain at least four points, and for best results you should make your start & finish lines at least 15 meters “thick”, to make sure that CrewNerd has enough time to see you inside the polygon, even if you’re moving quickly.
Note: the color of your polygons doesn’t matter, but you may find it helpful to use green and red shading for the start and finish.
Adding Waypoints
A waypoint is just an area that you intend to pass through between the start and finish of a custom course. Like the start and finish lines, waypoints are polygons, and you can add any number of them to a custom course. (Note: the start and finish areas are treated like waypoints for purposes of navigation)
Waypoint names must start with “WP” followed by a number that is used to establish their order in the course. A space between the WP and the number is optional, and the number may include a decimal point. The following are all valid waypoint names: “WP1”, “WP 3.2”, and “WP99.1”.
You may use the polygon’s “description” field to provide a more friendly name for the waypoint. If you add a description, this will be used in (optional) text pop-up messages when you enter and leave each waypoint. If no description is given, the waypoint name will be used.
Remember that a waypoint is both a target for navigation, and an area that you pass through. As you design the shape of a waypoint, think about the direction that you will be coming from, and the location that would be the best place to enter the waypoint. It’s a good idea to add an extra point to the polygon and extend it slightly toward the direction you’ll be approaching from. This way, you can be sure that CrewNerd will navigate you toward the ideal entry into the waypoint.
Similarly, if the waypoint marks a turn (around a buoy, for example), it’s a good practice to extend the boundary of the waypoint to include the entire turn. This way, CrewNerd won’t try to navigate you to the next waypoint prematurely, while you’re still negotiating a turn. If you place the exit of the waypoint well, CrewNerd will start giving you distance and course to the next waypoint only when you’re ready to navigate directly to it.
See the “Pro Tips” section below for more discussion of these points, along with examples (including screenshots).
Moving the Courses to your Phone
When you are done creating your custom courses in Google Earth Pro, save your work by right-clicking on the “courses” node in the “Places” window, and then select “Save Place As…”. Be sure to save as a KML file (i.e. not KMZ) and choose a location in cloud storage that you’ll be able to access from your phone.

To complete the process of updating the custom courses on your phone, follow the directions below as appropriate for your phone.
iPhone
Open the “Files” app and browse to the location where you saved the courses.kml file from Google Earth Pro. Press and hold on the courses file and then select “Copy”.
Now, press the “Browse” tab to go back to the locations list and select “On My iPhone”. Select CrewNerd (or CrewNerd Lite) and scroll to the bottom of the file list. Press & hold in the empty area under the last file, then select “Paste”. You’ll be asked if you want to replace existing items – select “Replace” to replace the old courses file with your new one.
Android
To install your new courses file on Android, open CrewNerd and go to the workouts page. In the app menu, select “Import custom courses” and browse to the location where you saved your changes. Select the file and CrewNerd will import your changes.
Using Custom Courses
To use a custom course, go to the workouts page in CrewNerd and press the “custom courses” button. When you select one of the custom courses in the list, it will be loaded but the navigation bar will be red and the timer is disabled.
When you are on the right side of the start line and ready to move toward it, press the “Start” button to enable the timer. The navigation bar color will change to yellow to indicate that the timer is “armed” and CrewNerd is monitoring your location. When you enter the start area, the timer will start and the navigation bar color will change to green.
Note that as soon as the course is loaded, the new data fields described in the next section are working, providing information about your distance to the start area and any course correction required to get there, even before the timer is running.
Data Fields
Three new data fields have been added to the Row/Paddle screen to assist with waypoint navigation.
- Distance to waypoint
This field shows the distance to the nearest point in the current navigation target (start, finish, or waypoint). Remember that this may underestimate the true distance if you can’t navigate to the target in a straight line.
When you are inside a waypoint, this field will show zero.
- Time to waypoint
Using your current speed, this field estimates the time left until you reach the next navigation target (start, finish, or waypoint).
When you are inside a waypoint, this field will show the name of the waypoint that you’ve reached.
- Course to waypoint
This is probably the most interesting and powerful new data field. Based on your most recent movement (and including effects of wind, current, etc.) this field shows the course correction required to navigate a straight line to the nearest point in the current navigation target.
The course correction is expressed in terms of the number of degrees that you need to turn, and depending on an app setting (described below), the direction to turn can be shown either as a left/right arrow, or as P/S, to indicate a required turn to port or starboard.
When you are inside a waypoint, this field will show the name of the waypoint that you’ve reached.
App Settings
The following new settings allow you to customize the behavior of the app with regard to custom courses and waypoints.
- Auto-skip missed waypoint
If this option is selected, CrewNerd will attempt to detect when you have missed a waypoint, and will automatically skip to the next one.
- Waypoint course indicator
This setting allows you to choose whether to show course corrections with left/right arrows or port/starboard indicators (P/S). If you choose left/right arrows, make sure that your “direction of user” setting is correct, or your arrows will be reversed.
- Minimum course correction shown
To avoid unnecessary distractions, it’s useful to ignore minor course errors. This setting lets you set the minimum threshold for course errors to be reported. Course errors below the threshold will be ignored.
- Text popups
If this option is enabled, a popup window will be shown as you enter and leave each waypoint.
- Entering waypoint sound
If this option is enabled, a sound will be played each time you enter a waypoint.
- Leaving waypoint sound
If this option is enabled, a sound will be played each time you leave a waypoint.
Pro Tips
Know your landmarks
When you create a custom course for a race, the race organizers may provide a KML (or KMZ) file showing the course and relevant landmarks or buoys. If so, you can open this in Google Earth Pro and use it as a guide for creating your custom course for CrewNerd.
When creating custom courses for your “home water”, it’s also critical to know where important landmarks are located. In some cases, these will be obvious in Google Earth, but things like buoys or other small landmarks will not be visible on the map, so it helps to be able to see their precise location as you create a course.
If you take a tour of the landmarks on your water, you can use an app like GPS Waypoints (Android) or GPS Coordinate Recorder (iPhone) to record the location of each one and then export them all as a single KML file that you can load into Google Earth Pro and use as a guide when creating your custom courses.
Don't make your polygons too small
Be sure to give yourself room for error when creating your start line, finish line, and waypoints. Make the polygons wide enough that you’ll still hit them if your course is a little off. If you need to navigate to one side of a buoy, give yourself plenty of room to swing wide on the “good” side.
Also, make sure your polygons are at least 15 meters “thick”, so you can’t slip through them without getting at least two GPS readings inside the polygon.
If your intuition is to make a smaller polygon to help you navigate more precisely to a particular spot, the better way to do that is to add an extra point to the “incoming” side of the polygon, as described in the next tip.
Design the "front edge" of a waypoint with care
Recall that CrewNerd navigates you to the nearest point of the next waypoint. By adding an extra point to the front edge of your waypoints, you can control exactly where that nearest point will be.
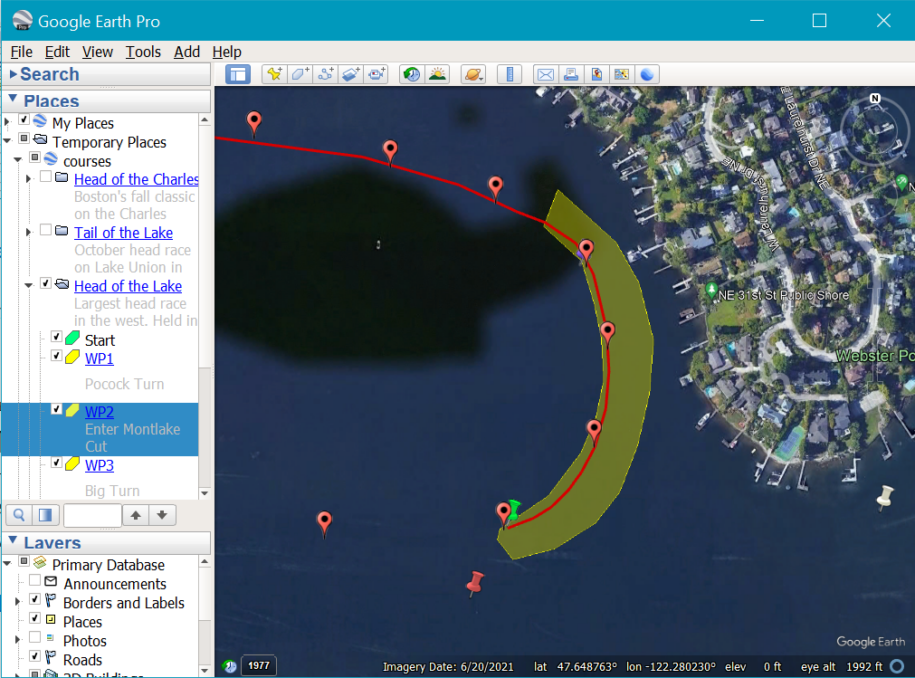
Below, you can see one turn from the Head of the Lake race course in Seattle. This turn is in Portage Bay, with an approach from the northwest, and a slight port turn around the buoy (the red pin on the map) to head straight east into the Montlake Cut.
To make a good turn, we want to head toward a point slightly southwest of the buoy where we plan to initiate the turn. By adding an extra point that extends out in the direction we’ll be approaching from, we can be sure that this is the “nearest point” and that CrewNerd will direct us to that exact location. If we removed that point, the nearest point would then be right at the buoy, which is definitely not where we want to be!
The same logic will often apply to start/finish lines as well. Even if the start/finish line is perpendicular to the direction you’re traveling in, you may want to position yourself more to one side or the other, depending on the course. An extra point on the incoming edge of the start/finish that “sticks out” just a bit can help put you where you want to be.
Extend waypoints through a turn
Remember that waypoints are both something that you navigate toward, and something that you can be “in”. When you are in a turn, you’re usually navigating visually around buoys or the shore of a river, or some other landmark. If you leave the waypoint before you’ve actually completed the turn, then CrewNerd will start trying to navigate you in a straight line toward the next waypoint before you’re ready.
As long as you remain inside the waypoint, CrewNerd will simply show the waypoint name in the waypoint data fields, avoiding unnecessary distractions. By enlarging your waypoint to include the entire turn, you can be intentional about when CrewNerd starts directing you to the next waypoint.
As an example, the turn shown below sweeps around several buoys before straightening out and we’ve extended the waypoint all the way around the turn. (Note: the placemarks and the red line come from the race organizers and are not part of the custom course.)
Multiple laps? No problem!
You can easily create courses that loop around the same landmarks multiple times! Remember that CrewNerd uses the waypoint numbers to determine the order that they should be visited. To make a loop, just create multiple copies of the same waypoint (copy/paste in Google Earth Pro), and then edit the waypoint names to put them in the required order. You might also want to edit the waypoint descriptions to include the lap number.
The same idea applies to out-and-back courses as well; you can have overlapping waypoints for the “out” and “back” portions of a course. CrewNerd only looks for the “next” waypoint, so it’s no problem if you pass through waypoints on the way out that you’ll be visiting on the return path. They’ll be ignored until you have passed through all of the waypoints before them.
Don't renumber your waypoints (unless you really want to)
Because waypoint numbers can include a decimal point, you never need to renumber your waypoints when adding a new one. Just pick a number between the two waypoints where you’re making the insertion.